Back to Integrations
integrationWebhook node
integrationHome Assistant node

Webhook and Home Assistant integration

Save yourself the work of writing custom integrations for Webhook and Home Assistant and use n8n instead. Build adaptable and scalable Development, Core Nodes, and Miscellaneous workflows that work with your technology stack. All within a building experience you will love.

How to connect Webhook and Home Assistant

  • Step 1: Create a new workflow
  • Step 2: Add and configure nodes
  • Step 3: Connect
  • Step 4: Customize and extend your integration
  • Step 5: Test and activate your workflow

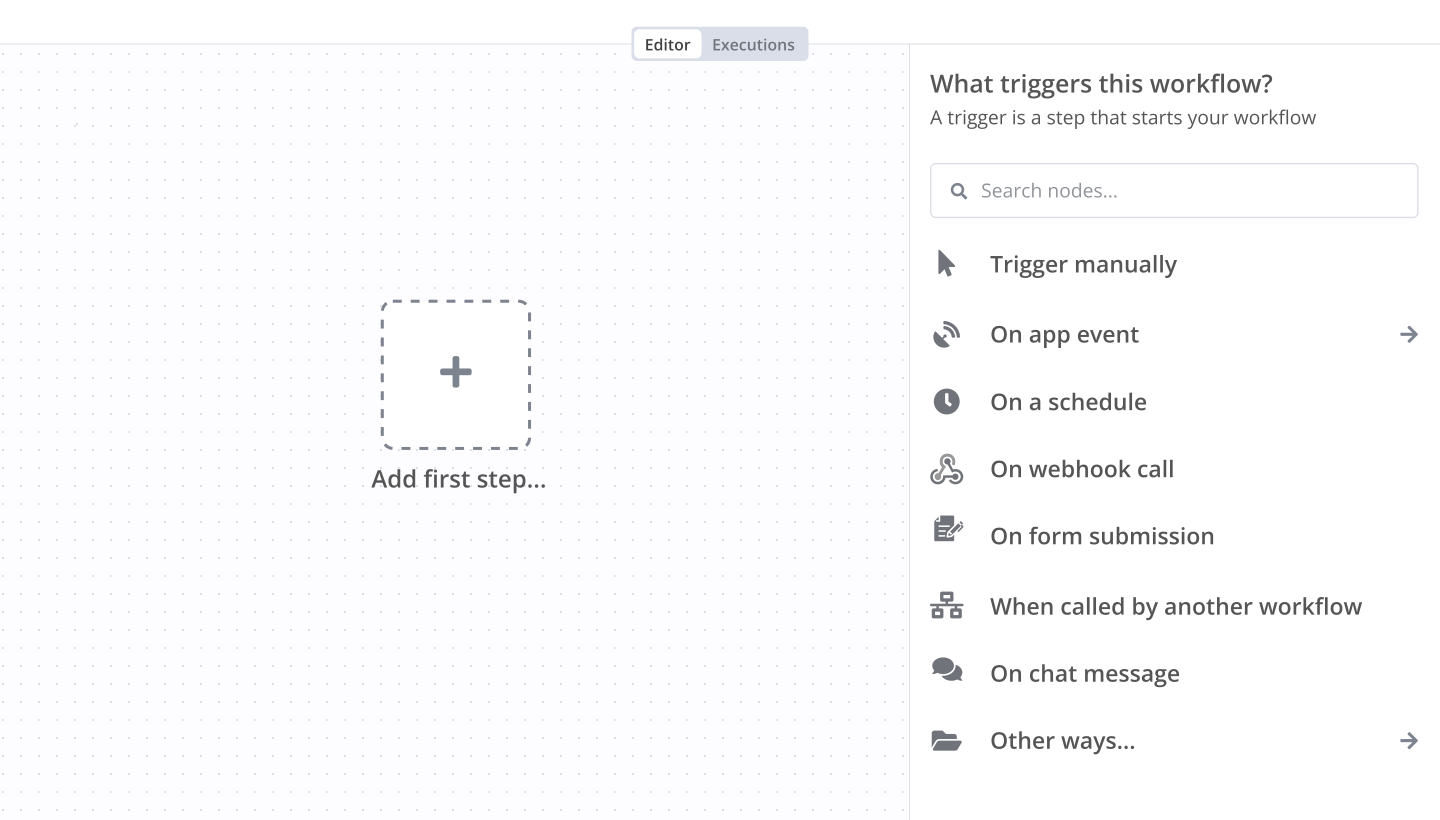
Step 1: Create a new workflow and add the first step

In n8n, click the "Add workflow" button in the Workflows tab to create a new workflow. Add the starting point – a trigger on when your workflow should run: an app event, a schedule, a webhook call, another workflow, an AI chat, or a manual trigger. Sometimes, the HTTP Request node might already serve as your starting point.

Webhook and Home Assistant integration: Create a new workflow and add the first step

Step 2: Add and configure Webhook and Home Assistant nodes

You can find Webhook and Home Assistant in the nodes panel. Drag them onto your workflow canvas, selecting their actions. Click each node, choose a credential, and authenticate to grant n8n access. Configure Webhook and Home Assistant nodes one by one: input data on the left, parameters in the middle, and output data on the right.

Webhook and Home Assistant integration: Add and configure Webhook and Home Assistant nodes

Step 3: Connect Webhook and Home Assistant

A connection establishes a link between Webhook and Home Assistant (or vice versa) to route data through the workflow. Data flows from the output of one node to the input of another. You can have single or multiple connections for each node.

Webhook and Home Assistant integration: Connect Webhook and Home Assistant

Step 4: Customize and extend your Webhook and Home Assistant integration

Use n8n's core nodes such as If, Split Out, Merge, and others to transform and manipulate data. Write custom JavaScript or Python in the Code node and run it as a step in your workflow. Connect Webhook and Home Assistant with any of n8n’s 1000+ integrations, and incorporate advanced AI logic into your workflows.

Webhook and Home Assistant integration: Customize and extend your Webhook and Home Assistant integration

Step 5: Test and activate your Webhook and Home Assistant workflow

Save and run the workflow to see if everything works as expected. Based on your configuration, data should flow from Webhook to Home Assistant or vice versa. Easily debug your workflow: you can check past executions to isolate and fix the mistake. Once you've tested everything, make sure to save your workflow and activate it.

Webhook and Home Assistant integration: Test and activate your Webhook and Home Assistant workflow

Notify on menu orders via ntfy and Home Assistant TTS with daily BAC tracking

Notify on menu orders via ntfy and Home Assistant TTS with daily BAC tracking

Receive instant push notifications on your phone and voice announcements on your Google Home every time someone orders from your intranet menu — with cumulative BAC tracking per person.

> Full documentation & step-by-step setup guides:
> 📖 Notion Documentation
> 💻 GitHub Repository

What This Workflow Does

Every time a customer submits an order from your intranet menu website, this workflow:

Receives the order via Webhook
Logs it to an n8n DataTable and reads all orders for that person today
Calculates the cumulative BAC (Blood Alcohol Content) using the Widmark formula
Sends a push notification via ntfy (with order history + BAC level)
Triggers a Home Assistant script → voice announcement on Google Home

No cloud TTS fees. No external AI services. Fully self-hosted.

Flow

Webhook → Prepare Order → DataTable (INSERT) → Read Today's Orders → BAC Calculator → ntfy Push Notification → Home Assistant TTS

Example Output

Push notification (ntfy app):

🛎 Order from Mario

Mario: 1x Pizza, 2x Beer 33cl
🕐 12:30
📋 Ordered before:
1x Prosecco 🕐 11:45
🍸 BAC ~0.54 g/L 🔴

Google Home voice announcement:

Mario has ordered Pizza

Prerequisites

Before importing this workflow, you need:

A running n8n instance (self-hosted or cloud) reachable from the internet
Home Assistant** on your local network (e.g. homeassistant.local:8123)
At least one Google Home (or Chromecast-capable) device added to HA via the Google Cast integration
ntfy** deployed via Docker (self-hosted push notification server)
A public HTTPS URL for ntfy — recommended via Cloudflare Tunnel (no open ports needed)
An Android or iOS device with the ntfy app installed

Credentials Required

Credential Used For
Home Assistant Calling the annuncia_ordine TTS script
Header Auth (Authorization: Bearer <ntfy_token>) Sending authenticated requests to ntfy

n8n DataTable Schema

Create a DataTable in n8n → Data → Tables with these columns:

Column Type Description
item Text Full order string (e.g. "2x Negroni, 1x Messina 33cl")
person Text Normalised person name
alcol_grammi Number Total grams of alcohol for this order
data Text ISO date (YYYY-MM-DD)
orario Text Time string from the order

Copy the DataTable ID and paste it into the DataTable nodes inside the workflow.

Webhook Payload

Your menu website must POST this JSON to the Webhook Production URL:

{
"name": "Mario",
"time": "26/03/2026, 12:30:00",
"order": [
{ "section": "Food", "name": "Pizza", "details": "", "quantity": 1 },
{ "section": "Drinks", "name": "Beer", "details": "33cl", "quantity": 2 }
],
"total": 3
}

Setup Steps

  1. Deploy ntfy (self-hosted push notifications)

Add ntfy to your docker-compose.yml:

ntfy:
image: binwiederhier/ntfy
command: serve
volumes:
./ntfy/config:/etc/ntfy
./ntfy/data:/var/lib/ntfy
ports:
"8095:80"

In server.yml, set auth-default-access: deny-all.

Then create an admin user and generate a token:

docker exec -e NTFY_PASSWORD="your_password" ntfy ntfy user add --role=admin admin
docker exec ntfy ntfy token add admin

  1. Expose ntfy over HTTPS (Cloudflare Tunnel)

Add an ingress rule to your Cloudflare Tunnel config:

hostname: ntfy.YOUR_DOMAIN.com
service: http://localhost:8095

  1. Configure Home Assistant TTS

In HA, go to Settings → Automations & Scenes → Scripts → Add script → Edit in YAML and paste:

alias: annuncia_ordine
sequence:
action: tts.speak
target:
entity_id: tts.google_translate_en_com
data:
media_player_entity_id: media_player.YOUR_GOOGLE_HOME_ENTITY
message: "{{ message }}"
language: it
mode: single

> Replace media_player.YOUR_GOOGLE_HOME_ENTITY with your actual entity ID.

Then go to your HA profile → Security → Long-lived access tokens → create and copy a token.

  1. Import and configure the workflow

Import the workflow JSON into n8n

Create the DataTable (columns listed above) — copy its ID

Create the Header Auth credential for ntfy:

Header Name: Authorization
Header Value: Bearer YOUR_NTFY_TOKEN

Create the Home Assistant credential:

Host: http://homeassistant.local:8123
Access Token: your HA long-lived token

In the ntfy notification node, replace YOUR_TOPIC in the URL

In the Home Assistant TTS node, set the message attribute expression:

  ={{ $('Webhook').item.json.body.nome }} has ordered {{ $('Webhook').item.json.body.ordine[0].nome }}

Activate the workflow and copy the Webhook Production URL

  1. Configure your menu website

Set the webhook URL in your menu site config:

// menu-data.js
"orderWebhook": "https://YOUR_N8N_DOMAIN/webhook/menu"

BAC Calculation (Widmark Formula)

BAC [g/L] = total_alcohol_grams_today / (70 × 0.68)

Assumes ~70 kg body weight. Italian legal driving limit: 0.5 g/L

Emoji Level BAC
None 0 g/L
🟢 Low < 0.2 g/L
🟡 Warning 0.2 – 0.5 g/L
🔴 Over limit > 0.5 g/L

BAC is cumulative per day per person and resets automatically the next day.

Customization

What How
Change the TTS message Edit the message expression in the HA TTS node
Announce all ordered items Use $json.body.ordine.map(i => i.quantita + ' ' + i.nome).join(', ')
Change TTS language Edit language in the annuncia_ordine HA script
Announce on multiple Google Home devices Add multiple media_player_entity_id entries to the HA script
Disable TTS (keep only push notification) Remove or deactivate the Home Assistant TTS node

Security

Layer Mechanism
Transport (ntfy) HTTPS via Cloudflare Tunnel
ntfy access auth-default-access: deny-all — no anonymous reads
n8n → ntfy Dedicated Bearer token (revokable, no expiry)
n8n → Home Assistant Long-lived access token
Mobile app Username/password on the ntfy server

Documentation & Source

📖 Full documentation Notion — step-by-step setup guides
💻 GitHub Repository paoloronco/n8n-templates

Related Resources

ntfy.sh documentation
Home Assistant TTS documentation
Home Assistant Scripts
Google Cast integration
n8n Home Assistant node

Nodes used in this workflow

Popular Webhook and Home Assistant workflows

Notify on menu orders via ntfy and Home Assistant TTS with daily BAC tracking

Notify on menu orders via ntfy and Home Assistant TTS with daily BAC tracking Receive instant push notifications on your phone and voice announcements on your Google Home every time someone orders from your intranet menu — with cumulative BAC tracking per person. > Full documentation & step-by-step setup guides: > 📖 Notion Documentation > 💻 GitHub Repository What This Workflow Does Every time a customer submits an order from your intranet menu website, this workflow: Receives the order via Webhook Logs it to an n8n DataTable and reads all orders for that person today Calculates the cumulative BAC (Blood Alcohol Content) using the Widmark formula Sends a push notification via ntfy (with order history + BAC level) Triggers a Home Assistant script → voice announcement on Google Home No cloud TTS fees. No external AI services. Fully self-hosted. Flow Webhook → Prepare Order → DataTable (INSERT) → Read Today's Orders → BAC Calculator → ntfy Push Notification → Home Assistant TTS Example Output Push notification (ntfy app): 🛎 Order from Mario Mario: 1x Pizza, 2x Beer 33cl 🕐 12:30 📋 Ordered before: 1x Prosecco 🕐 11:45 🍸 BAC ~0.54 g/L 🔴 Google Home voice announcement: Mario has ordered Pizza Prerequisites Before importing this workflow, you need: A running n8n instance (self-hosted or cloud) reachable from the internet Home Assistant** on your local network (e.g. homeassistant.local:8123) At least one Google Home (or Chromecast-capable) device added to HA via the Google Cast integration ntfy** deployed via Docker (self-hosted push notification server) A public HTTPS URL for ntfy — recommended via Cloudflare Tunnel (no open ports needed) An Android or iOS device with the ntfy app installed Credentials Required | Credential | Used For | | ------------------------------------------------------ | ---------------------------------------- | | Home Assistant | Calling the annuncia_ordine TTS script | | Header Auth (Authorization: Bearer <ntfy_token>) | Sending authenticated requests to ntfy | n8n DataTable Schema Create a DataTable in n8n → Data → Tables with these columns: | Column | Type | Description | | -------------- | ------ | ------------------------------------------------------ | | item | Text | Full order string (e.g. "2x Negroni, 1x Messina 33cl") | | person | Text | Normalised person name | | alcol_grammi | Number | Total grams of alcohol for this order | | data | Text | ISO date (YYYY-MM-DD) | | orario | Text | Time string from the order | Copy the DataTable ID and paste it into the DataTable nodes inside the workflow. Webhook Payload Your menu website must POST this JSON to the Webhook Production URL: { "name": "Mario", "time": "26/03/2026, 12:30:00", "order": [ { "section": "Food", "name": "Pizza", "details": "", "quantity": 1 }, { "section": "Drinks", "name": "Beer", "details": "33cl", "quantity": 2 } ], "total": 3 } Setup Steps Deploy ntfy (self-hosted push notifications) Add ntfy to your docker-compose.yml: ntfy: image: binwiederhier/ntfy command: serve volumes: ./ntfy/config:/etc/ntfy ./ntfy/data:/var/lib/ntfy ports: "8095:80" In server.yml, set auth-default-access: deny-all. Then create an admin user and generate a token: docker exec -e NTFY_PASSWORD="your_password" ntfy ntfy user add --role=admin admin docker exec ntfy ntfy token add admin Expose ntfy over HTTPS (Cloudflare Tunnel) Add an ingress rule to your Cloudflare Tunnel config: hostname: ntfy.YOUR_DOMAIN.com service: http://localhost:8095 Configure Home Assistant TTS In HA, go to Settings → Automations & Scenes → Scripts → Add script → Edit in YAML and paste: alias: annuncia_ordine sequence: action: tts.speak target: entity_id: tts.google_translate_en_com data: media_player_entity_id: media_player.YOUR_GOOGLE_HOME_ENTITY message: "{{ message }}" language: it mode: single > Replace media_player.YOUR_GOOGLE_HOME_ENTITY with your actual entity ID. Then go to your HA profile → Security → Long-lived access tokens → create and copy a token. Import and configure the workflow Import the workflow JSON into n8n Create the DataTable (columns listed above) — copy its ID Create the Header Auth credential for ntfy: Header Name: Authorization Header Value: Bearer YOUR_NTFY_TOKEN Create the Home Assistant credential: Host: http://homeassistant.local:8123 Access Token: your HA long-lived token In the ntfy notification node, replace YOUR_TOPIC in the URL In the Home Assistant TTS node, set the message attribute expression: ={{ $('Webhook').item.json.body.nome }} has ordered {{ $('Webhook').item.json.body.ordine[0].nome }} Activate the workflow and copy the Webhook Production URL Configure your menu website Set the webhook URL in your menu site config: // menu-data.js "orderWebhook": "https://YOUR_N8N_DOMAIN/webhook/menu" BAC Calculation (Widmark Formula) BAC [g/L] = total_alcohol_grams_today / (70 × 0.68) Assumes ~70 kg body weight. Italian legal driving limit: 0.5 g/L | Emoji | Level | BAC | | ----- | ---------- | ------------- | | ⬜ | None | 0 g/L | | 🟢 | Low | < 0.2 g/L | | 🟡 | Warning | 0.2 – 0.5 g/L | | 🔴 | Over limit | > 0.5 g/L | BAC is cumulative per day per person and resets automatically the next day. Customization | What | How | | ----------------------------------------- | ------------------------------------------------------------ | | Change the TTS message | Edit the message expression in the HA TTS node | | Announce all ordered items | Use $json.body.ordine.map(i => i.quantita + ' ' + i.nome).join(', ') | | Change TTS language | Edit language in the annuncia_ordine HA script | | Announce on multiple Google Home devices | Add multiple media_player_entity_id entries to the HA script | | Disable TTS (keep only push notification) | Remove or deactivate the Home Assistant TTS node | Security | Layer | Mechanism | | -------------------- | ---------------------------------------------------- | | Transport (ntfy) | HTTPS via Cloudflare Tunnel | | ntfy access | auth-default-access: deny-all — no anonymous reads | | n8n → ntfy | Dedicated Bearer token (revokable, no expiry) | | n8n → Home Assistant | Long-lived access token | | Mobile app | Username/password on the ntfy server | Documentation & Source | | | | ------------------------ | ------------------------------------------------------------ | | 📖 Full documentation | Notion — step-by-step setup guides | | 💻 GitHub Repository | paoloronco/n8n-templates | Related Resources ntfy.sh documentation Home Assistant TTS documentation Home Assistant Scripts Google Cast integration n8n Home Assistant node

AI-Generated Weather Analysis with NWS Alerts, Radar Imagery, and Home Assistant

Overview This n8n template demonstrates how you can generate an AI-produced weather analysis of your local radar loop and home assistant precipitation sensor(s) to keep your family informed of National Weather Service Alerts. With as crazy as things have been lately in the open world, how will you and your family know when a severe or extreme alert impacts your area? How it Works This workflow is triggered by a webhook which takes a latitude and longitude json payload to identify the area for monitoring. Then, it fetches the National Weather Service Alerts and filters them down to alerts which are currently active and their severity. Next, it fetches the local precipitation value from your Home Assistant instance (a value like "Light Rain" or "No Rain", etc) coupled with your respective weather.gov radar loop image. It then submits this data to OpenAI and produces an output regarding the image analysis. Finally, it takes this analysis and uses OpenAI to again generate a short summary. How to Use Import the workflow into your n8n instance Update the credentials in the problematic nodes Make sure you adjust the radar loop image that is being used Requirements A Home Assistant Instance (you could remove this data if you wanted) An OpenAI account for LLM and image analysis

Build your own Webhook and Home Assistant integration

Create custom Webhook and Home Assistant workflows by choosing triggers and actions. Nodes come with global operations and settings, as well as app-specific parameters that can be configured. You can also use the HTTP Request node to query data from any app or service with a REST API.

Home Assistant supported actions

Get Screenshot
Get the camera screenshot
Get
Get the configuration
Check Configuration
Check the configuration
Create
Create an event
Get Many
Get many events
Get Error Logs
Get a log for a specific entity
Get Logbook Entries
Get all logs
Call
Call a service within a specific domain
Get Many
Get many services
Create or Update
Create a new record, or update the current one if it already exists (upsert)
Get
Get a state for a specific entity
Get Many
Get many states
Create
Create a template

Webhook and Home Assistant integration details

integrationWebhook node
Webhook

Webhooks are automatic notifications that apps send when something occurs. They are sent to a certain URL, which is effectively the app's phone number or address, and contain a message or payload. Polling is nearly never quicker than webhooks, and it takes less effort from you.

Use case

Save engineering resources

Reduce time spent on customer integrations, engineer faster POCs, keep your customer-specific functionality separate from product all without having to code.

Learn more

FAQs

  • Can Webhook connect with Home Assistant?

  • Can I use Webhook’s API with n8n?

  • Can I use Home Assistant’s API with n8n?

  • Is n8n secure for integrating Webhook and Home Assistant?

  • How to get started with Webhook and Home Assistant integration in n8n.io?

Need help setting up your Webhook and Home Assistant integration?

Discover our latest community's recommendations and join the discussions about Webhook and Home Assistant integration.
Benjamin Hatton
Albert Ashkhatoyan
Víctor González
Salomão
sg tech

Looking to integrate Webhook and Home Assistant in your company?

Over 3000 companies switch to n8n every single week

Why use n8n to integrate Webhook with Home Assistant

Build complex workflows, really fast

Build complex workflows, really fast

Handle branching, merging and iteration easily.
Pause your workflow to wait for external events.

Code when you need it, UI when you don't

Simple debugging

Your data is displayed alongside your settings, making edge cases easy to track down.

Use templates to get started fast

Use 1000+ workflow templates available from our core team and our community.

Reuse your work

Copy and paste, easily import and export workflows.

Implement complex processes faster with n8n

red iconyellow iconred iconyellow icon